
Installing new Nitro axle shafts.
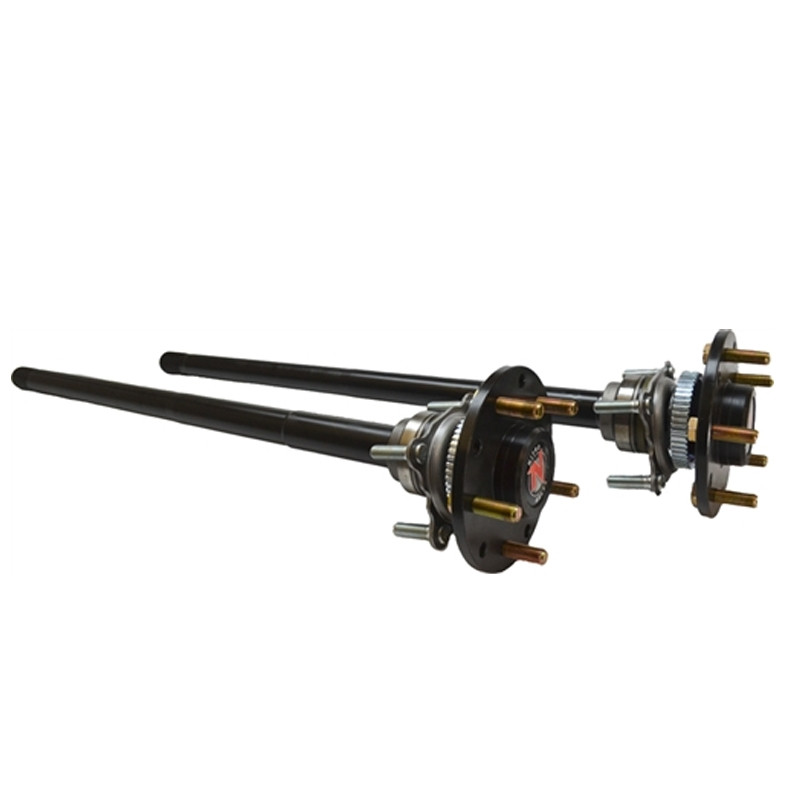
Nitro Jeep JK Axle Shafts
Average cost: $573.33
35 Spline Rear Axle Shaft x2
axle studs x10
ABS Tone Rings x2
retainer plates x2
axle bearings x2
seals x2
2 out 5 Torque Wrenches
Not a heavy lift at all, can be down in your garage.
The stock OEM rear drive shafts are simply not suitable for heavy off-roading adventures when you start hitting heavier obstacles. Once you re-gear you JK for sure you want to upgrade the shafts as well. Why have such expensive gears with mediocre shafts?
I decided to go with the Nitro gear kit since it already has the pressed bearings, and all needed to complete the job. There are alternatives out there but require a press machine to complete the job. In doing some research, I decided to go with Nitro Chromoly 35 spline kit. Extremely solid axles that can take a beating. You will need 18, 19 MM socket and wrench to complete the job along with an 8MM for the TPMS sensor. I like to also use red Loctite as these bolts take on some vibration for sure. Start one side at a time and make sure to jack that side up a bit higher than the other this way the differential oil doesn’t come leaking all out when you pull the OEM axles out. Once you pull the caliper off, make sure to hang it with a cord of some sorts in order to not damage the brake cable. Remove the TPMS sensor out, gently pull the red clip out and then pull the senor off. Once that is completed, use your 8MM socket to remove the sensor, it should come right out, take your time and wiggle it out. Once you have this completed, go ahead and remove the four bolts holding the OEM axle shafts. At this point you are ready to pull the axle out. I ended up taking my brake rotor and reversing it, use 3 lug nuts and grab a rubber mallet. Give it a few hits in a circle formation and the axle should come loose off the bearing sleave. At this point you should only have the bearing sleeve in place on the rear end. There should be some grease left in that area, make sure to take your finger and get the grease all of the front of the sleeve. Now take two fingers on opposite sides and start to work the sleeve out. It should come out, just take your time, do not try doing one side only it will only drive you crazy, you must try and gently pull the sleeve out with two fingers applying the same pressure. You will feel it start to move and once it hits the oil it will slide out. Once you have removed the sleeve, go ahead and use some brake cleaner and clean the area up. Remove all debris. Add some oil from the OEM axle shaft, should have some you can use, grease the area you just removed the bearing sleeve from. Now it’s time to insert the new Nitro Axle, gently guide it into the rear end, I like to slowly place it into the rear end, once it hits the gear’/pinion, lift it up into the center and slowly let it slide into the gears. You will feel it slide perfectly into place. Make sure your axle plate is lined up properly with the bolts. Once you are all good, hit the center of the axle with the mallet, just small taps two will do. Take the red loctite and place some onto the studs from the axle plate. Add the nuts and start to tighten it down in a star pattern. Torque these down to 50lbs. Place the calipers back on and add some red loctite and torque to 55lbs. Make sure the TPMS sensor has a little bit of blue loctite and tighten this down, you can do 25-30lbs but a good hand tight will do. Once all the nuts are torqued take a sharpie oil-based marker and make the nuts, this will help with checking if any of the nuts have come loose during inspection. That is pretty much it. Check out the videos as well.