
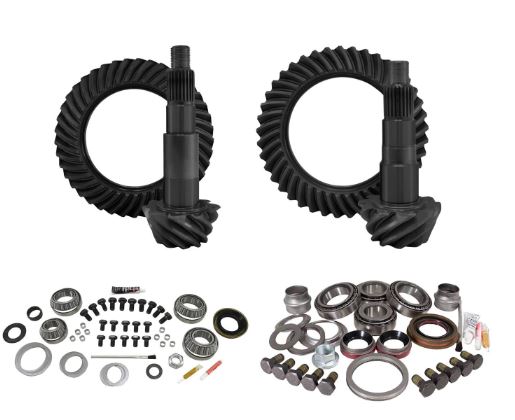
Front and rear upgraded gears Dana 30/44
5 out of 5 Torque Wrenches
Master Mechanic Skills needed or at least high-level weekend warrior mechanic.
Best gears hands down. Do not get any other gears, full complete set!
One of the toughest covers out there and easiest upgrades to do on your own.
It was time to upgrade the good ole’ 3.21 gears that came with my Jeep JK Chief. They have been absolutely great and taking a beating with the 35″ tires first and now 37″ tires.
It was time to upgrade to a heavy grade Yukon gear set for both the front and rear axles. Dana 30 up front and Dana 44 in the rear. Dana has a long-lasting record in this space, they make solid housings/axels. Hence why they are installed into Jeeps that take a beating. That being said, I will eventually upgrade the front and rear axle shafts with Yukon 4340. For now, the stock will work.
Regearing any vehicle requires the correct tools and patience. You will need to spare bearings, good press machine and inch torque wrench along with some other tools (gab pinion/ring, etc.).
You begin with lifting the Jeep JKU as high as you can and use 12ton jacks (like I did since I do not have a lift…yet) to stand the frame onto. Make sure all is nice and stable. I like to use my 10ton jacks as backups incase my 12ton fails for some godly reason. Better safe than sorry. I like to also throw the 37″ tires under the middle of the Jeep as a last stop resort. Do as you will but definitely make sure all is good before you start moving onto removing the tires and working on the Jeep.

Begin taking all of the tires off, place them in the middle of the Jeep, laying flat, under the main frame (if you would like additional safety precautions). Once that is all set, let’s move onto removing the brake pads and rotors, there will be 4 bolts for the calipers (they will be torqued, you may need a break bar or a nice air gun which is what I use). Once you have those removed, move into the middle section and remove the ABS sensor and lastly the back plate for the brakes. Once that is all removed, using two hands pull the shaft out, be careful not to damage the seal, use two hands to keep the shaft perfectly in the middle while pulling it out of the axle.
Repeat for both the passenger front and the rear as well. Once you have all the Shafts out, we will move onto the housing cover. I have ARB, it has a nice drain plug, I drained my axle fluid first vs. old school pop the cover which tends to be a bit messy but nevertheless go ahead and pull the covers off.
Once you have your gears exposed let this be as is. Concentrate on the back side now and remove the drive shaft from the knuckle on your pinion. Once that is remove from both the rear and front, let’s shift back to the front area. Using a nice large size flat head screwdriver, you will remove first the four bolts on both side of the ring, in the housing. Take note of how many shims are on both sides of the housing. You can use this a starting point when adding the new shims from Yukon. Once those are removed, simply use the large flat head and situate it in a way that you can simply spin the pinion from the rear and the whole housing should fall right out, be careful you will need to catch it!

Fun begins, now you will need to start removing the bolts holding the ring onto the housing. You will need some special tools at this point (clam shells) with a press to remove the bearings from the pinion. Once you have all of this removed, you can now begin with the complete rebuild of your 5.13 gears from Yukon. They make the best kits and best period on gearing hands down. Follow the correct steps on adding bearings back into place. Sometimes you can heat up the ring to slip it back onto your housing. Once you have that all set and torqued. Time to slip it back into the housing. The rear Dana 44 is easy, and you do not need to upgrade the carrier, but the Dana 30 front will require a new carrier to take in the 5.13 gears. NOTE: Make sure to order a nice carrier for the Dana 30. Get the gears into the housing, add the pinion from the rear and the same number of shims as the OEM installs had. Using your gap tool of choice, make sure you have the right gap (less than 8, somewhere around 6.5 should do it). Go ahead and paint with the supplied yellow paint and give it some spins, make sure you have the perfect pinion and ring connection. Once you feel good, let’s start to get the cover back on, make sure you used brake cleaner and clean out that housing before closing the cover on it. Reconnect the knuckle in the back side make sure to not over tighten as the crush sleave will collapse on you. Little at a time with a heavy-duty air gun and check the slack as you do it. Torque all the shafts back into place, time to now fill the Dana 30 and 44 with 89-90 synthetic. I like to jack one side up higher and make sure it fills the axle tubes. You are all set, make sure to follow the 500-mile break in. You DO NOT want to drive it for more than 20 minutes after the initial install. Once you hit the 20 minutes, pull over or park it back in the driveway for about 25 minutes. Once that initial is set, then stay away from long trips for the first 500 miles, keep it under 40 miles per hour. Don’t mind if you get honked at, just do it! Once that is set, you will be able to burn rubber!
You must be logged in to post a comment.